Saturday, December 21, 2013

Muslin #1

The Pattern 
This week I started making the "muslin," which is a prototype of the dress-to-be, cut from muslin fabric,and used to perfect the fit before cutting into the fashion fabric.   As I go, I'm following an online  Couture Sewing tutorial on Craftsy.com with my teacher-to-be, the famous (well in some circles) Susan Khalje.  If you don't know it, Craftsy is a great destination for learning all kinds of DIY projects, from baking to birdhouses.   There are some wonderful sewing courses up there, some free, most others well worth the price of admission.  

What is "Couture?"  As Susan K explains in her intro, it is about design, fabric, fit and proportion, engineering, and construction.  In order to achieve the precision and control of couture, there's a lot more hand sewing involved.  It's delayed gratification.  Very zen.   You've heard of the Slow Food movement?   Well this is Slow Sewing.  Which suits me just fine.

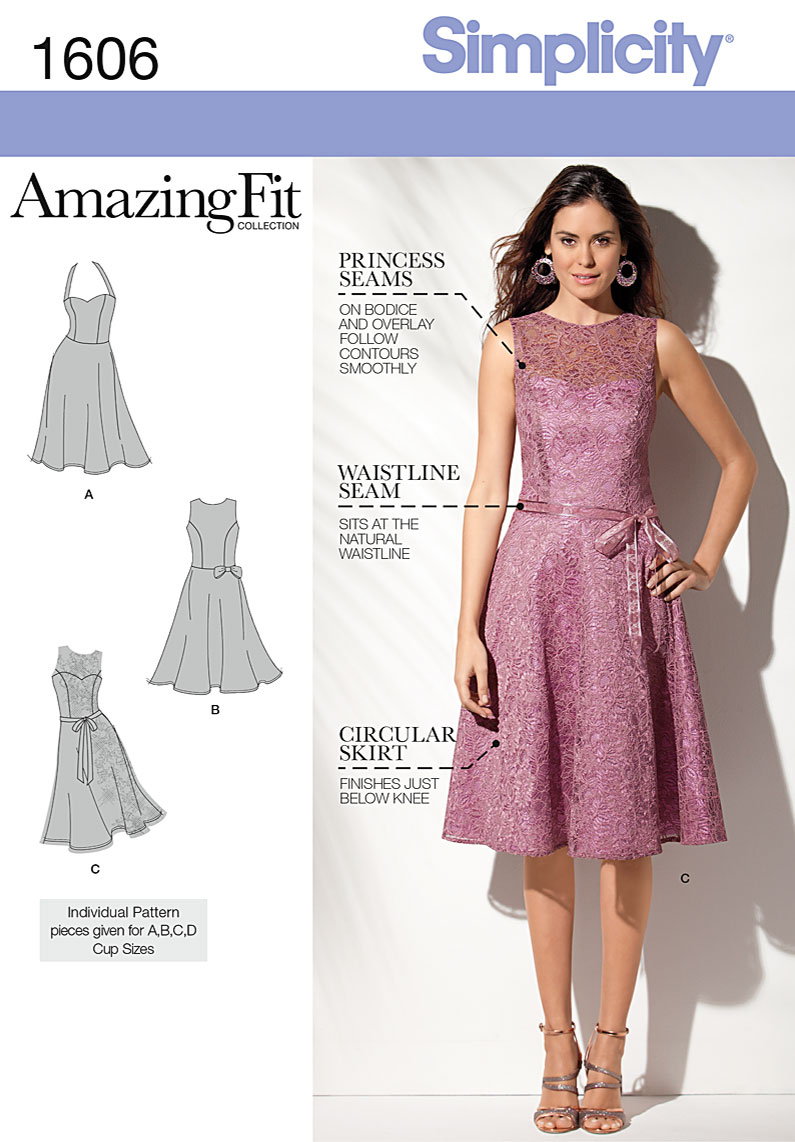
I've been corresponding with Susan about the sizing of Zoe's dress.  The pattern I'm starting from  is Simplicity 1606, part of their Amazing Fit series, which give you pattern piece options for A,B,C or D cup size.   I'm cutting 2 different bodice muslins, and will see which fits my model better when she comes down in mid-January.

So I've cut out the under-dress from muslin, and per Susan's suggestion, the overlay, which will ultimately be from the embroidered organza, using a cheap (pink) polyester organza from Joann's.  

Thread-traced "Muslin" pieces, awaiting assembly
Susan K instructs you to cut sort of haphazardly, without much regard for the "cutting lines", around each pattern piece, leaving at least an inch seam allowance.  With her method, it's the stitching lines that are all important.  After the pieces are cut out, using a tracing wheel and waxed, carbon type paper, you carefully transfer all the markings, stitch lines, grainlines, notches, etc. to the muslin and organza pieces.   Then, using a machine basting stitch, you carefully "thread-trace" the stitching lines on the muslin pieces so they show through on both right and wrong sides of the fabric.  There are more than a dozen pieces, so that's where I'm at now.

 Last step is to machine-baste it together, and let the fittings begin!

Thursday, December 12, 2013

Creating a Duct Tape Body Double


Before Zoe returned to Santa Cruz, we spent several hours wrapping her in duct tape to create a DIY dress form.   There are many step-by-step tutorials and videos online about how to do this.  I used the instructions from Thread's book, "Fitting for Every Figure."


Before you start, you have to tape a strip of cardboard or oaktag down the model's back.  When the wrapping is done and its time to remove the form, you cut along and through this strip.  Over the cardboard strip, your victom, er, model, puts on a long disposable T-Shirt, which will remain permanently inside the finished form.

You begin by doing a kind of Cross-Your-Heart with tape across the bust area.  Then you start to methodically encircle the model with varying strips of duct tape.


 The first layer is horizontal, second is vertical, and the final third layer wraps horizontal again.  

First Layer of Wrapping Accomplished

The book said it takes about $15 for supplies and 2 hours to do.  My experience was more like $25 and 3 hours, as we ran out of duct tape between the 2nd of 3 layers and had to send out for more tape during lunch.

Lunch Break between layers 2 and 3 


The book suggested using a decorative duct tape for the final layer, but we went with the industrial look.  

3rd Layer Done

After finishing the 3rd round of wrapping, I cut down the cardboard strip in back and removed the form from her body.


Zoe and her double before stuffing 


After we set Zoe free, I taped the form back together, reinforced the boobs with foam shoulder pads, stuffed the form with fiberfill, and plugged the bottom with fiber-core board.   

Fully Stuffed Clone

If I ever make another one,  I will:

1)  Start with a thinner T-Shirt - ours was very thick and
2) Make sure we have enough supplies!  

I hope the form proves useful as I sew without my live model.  It certainly is cheaper than buying and customizing a decent quality dress form, which can easily run into the $350-$400 dollar range!


Wednesday, December 4, 2013

Say Yes to the Lace


After deciding on the design and basic pattern for Zoe's dress, the next step was finding the perfect lace.   I mean, it's all about the lace, right?  Zoe had been cruising Etsy and finding lace she liked, and I kept poking around online and stopping by every time I'd pass a promising fabric store.  We kept  sending each other cell phone shots, but she just hadn't found the right one. 

So we set out on a Ladies' Shopping Day the day before Thanksgiving with my mom and Zoe's friend Alivia, (who is also getting married summer 2014.)  We hit the jackpot at International Silks and Woolens on Beverly Blvd,  when Alivia spotted it:


I'm not even sure if this is technically "lace, it's an embroidered sheer organza.  Which we  are going to line with a blush-colored under layer.  I'm going to consult with Susan Khalje before buying  the lining and underlining fabrics.  But the major purchase had been accomplished, and I'm beginning to be able to visualize the dress now.   It will be gorgeous.  


Monday, December 2, 2013

The Wedding Dress Saga Begins

My daughter Zoe got engaged last May, and is getting married in August 2014.  She is recruiting many of her friends to contribute to her woodsy, non-traditional wedding,  and has asked me to make her wedding dress.  I am honored, touched, delighted, and needless to say, very nervous.  But I am so excited to take on the project. I really can't think of anything more joyous than making this dress for my darling daughter.

Zoe and I have been noodling on the design for several months now.  Initially she chose a classic sort of Audrey Hepburn-esque style, Vogue 8766.   With that pattern in hand, we went shopping for fabric at Britex in San Francisco.   After falling in love with a number of gorgeous designer laces in the $200/yard price zone, which was too steep for my budget, we regrouped over lunch.  We decided Zoe should try on some RTW party dresses, and see what looked and felt good.  So we headed into Bloomies, and had a blast.  Zoe tried on about a dozen dresses, and looked gorgeous in many of them.


I took lots of cell phone pix of the style details she liked:  A sweetheart neckline, sheer lace overlay, sheer elbow length sleeves, possibly an inset waistband, and maybe an A-line skirt.  Based on our dressing room research, we ditched the Vogue pattern, and are now going to make a modified version of Simplicity 1606, View C. 

I attended a Pattern Review meetup last month, where I met many inspirational fellow LA-based Sewists.  I spoke at some length with talented Sue V, who made a wedding dress for her niece last spring.  She encouraged me to do what she had done: take Susan Khalje's Couture Workshop.  So with the generous support of my mom, I am signed up to take Susan's 6 day Couture Workshop in February.  

Zoe lives in NorCal, and I am in LA, so fittings are going to be a bit of challenge.  She was down for Thanksgiving, but I didn't have the properly sized pattern.  I had originally bought a pattern based on her bust measurement, but Susan Khalje advised me to measure the distance from armpit fold to armpit fold, and that came up size 10.   The first muslin I made was based on the 14, so that was set aside.   I'll  make the smaller sized muslin for Zoe to try on when she is back down here next month.


Saturday, November 23, 2013

New Name; New Focus

Since retiring earlier this year, I have had the  opportunity and pleasure of returning to my love of sewing, textiles and design.  I've sewed about a dozen tops, skirts and dresses for myself, some of which I've posted on Pattern Review.

One of the coolest things I've discovered about sewing now is the inspirational, helpful, hilarious and wise community of fellow sewists around the world.  So after lurking and enjoying the many many fabulous sewing blogs out there, I am taking the plunge and converting my long dormant hiking blog into a sewing journal.    Please join me on my new creative journey.